You will need…
- Quick Start Guide completed
- Site Types
- Site Properties
- Recurrent Actions
- Contract Owners
- Site Access Owners
Overview
This guide will provide a step-by-step solution on how you can create a new Site and continue to manage and edit them.
Creating & Editing a Site
Adding & Viewing Documents, Images and Forms against a Site
Set Site as an Asset Location
View Activity History at a Site
View Site on the User App
Site Lookup on the User App
Creating & Editing a Site

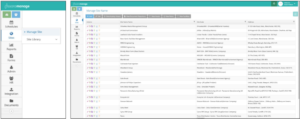
- In your MANAGE environment, hover over the Sites menu item.
- Navigate to the next page by clicking on Manage Site.
- Start by selecting the Add button to create a new Site.
- You will be presented with five tabs across the top of the page, all containing empty fields, needing to be populated with Site information.
- Add all of the relevant Site information including any mandatory information into each tab, making sure you use the Save Site Name and Continue button at the end of populating each tab.
- When populating the Site details, areas of this will be fields pre-populated with the information you have added when setting up your environment using the Quick Start Guide.
- Notice that once you have saved the Site, other tabs will appear, including the Site Name Type dependent tabs created in the Site Library > Site Properties area (see Quick Start Guide).
- You can link Sites by creating a Parent Site and adding ‘Dependent Sites‘ this will automatically set the Parent Site. You can link Sites by using the Site Name Hierarchy tab.
- If you use the Assets module and require the Site to be an Asset Location, you can navigate to the Assets tab and tick the box ‘Use this Site Name as an Asset Location‘.
- Add Recurrent Actions to the Site by selecting the Action from a drop-down list pre-populated at set up (see Quick Start Guide). This will add the Recurrent Action to the Site, where you can then either Create a Job or Trigger Workflow. The Create a Job function will automatically create a job depending on the lead time. The Job will then be placed on the Pending Job screen ready for scheduling.
- Selecting a Contract Owner will associate the Site with an owner or customer. Contract Owners are pre-populated at set up (see Quick Start Guide). You can generate a report on all Contract Owner activities/jobs to send over to clients.
Adding & Viewing Documents, Images and Forms against a Site
Once you have added a Site, you can upload documents and store them against a Site. This enables Users across the system to view these documents associated with the Site or Contract Owner.
- Under Sites > Manage Sites you should now see your list of Sites you have added into fissara MANAGE.
- By selecting a Site the ‘View Document Repository‘ button should appear in colour. Click on this button to view the Document Repository against the Site.
- Notice that there are three sections within the Document Repository – Documents, Images and Forms.
- The Documents area will allow you to store Site specific Documents that can be viewed on the web, for example, you could upload a Site contract.
- The Images folder will store all of the images and signatures taken from the Forms on the User App. These are extracted from the Forms and collated in one place.
- The Forms area allows you to view all Forms completed at that Site on the UserApp, including any Activity Forms or health and safety Forms etc.
- To upload a Document against a Site start by clicking the ‘Add new item‘ hyperlink to add either a new Folder or File. Files uploaded can only be viewed and downloaded on the web.
Set Site as an Asset Location
Setting a Site as an Asset Location will allow you to assign Assets to this Site, as well as carry out an Activity at that Site involving an Asset, for example the installation or removal of an Asset.
- Select a Site from your Site list (Sites > Manage Site).
- The Edit button should appear in colour, allowing you to click this.
- Clicking on the Edit button will bring up all of the Site information
- Navigate to the Assets tab.
- Use the tick-box (Use this Site Name as an Asset Location) to set the Site as an Asset Location, please note that once you have set this, it can’t be reverted.
- Once you have set the Site as an Asset Location, you can allocate Assets to this Site and mobile workers can install or remove Assets within an Activity at this Site on the User App.
View Activity History at a Site
- Select a Site and you will notice that the ‘See Activity History‘ button will appear in colour.
- When you select this button, you will see a full list of Activities against this Site, Activities will show as Scheduled, In Progress, Closed or Aborted.
- Any of these Activities can be viewed by using the magnifying glass icon next to each individual Activity.
View Site on the User App

- When you login to the User App you will be presented with the Job screen.
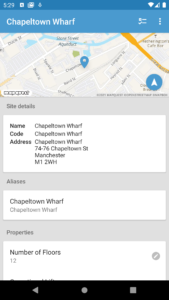
- Once you click into a Job, you can view the Site information here, including map directions.
- Navigate to the Sites tab at the top of the screen.
- A map will appear at the top, you can click on this for Site directions.
- Further down the page, you will see Site information that has been added on the Web, some of this information will have a pencil icon next to it allowing you to edit the information. This would have been set when adding and creating Site Properties (see Quick Start Guide).
- At the bottom of the page you will see all Journal Notes against the Site and a plus icon, allowing you to add more Journal Notes from the UserApp.
Site Lookup on the User App
This is used for viewing Site information and directions, Completing a Form associated to a Site or adding Journal Notes against that Site.

- Use the menu on the User App to find the Sites area.
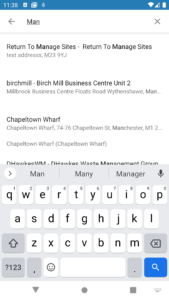
- Once you have clicked on the Sites section, you will see a list of Sites where you, as a User have outstanding Jobs, however you can search for a specific Site.
- Use the magnifying glass icon (top right) to search for a Site. This will search your whole database of Sites that have previously been added onto the system on the Web.
Notes
- See Triggering a Workflow via Sites if you have the Tasks Module enabled.
- See Assets for steps on how to allocate Assets to a Site, if you have the Assets Module enabled.
- See Journal Notes for more information on where these can be used.