You will need…
- Access to the Workflows module
Overview
Managing internal or customer faults is easy when using the tasks module. Set a kan-ban style board and progress work through seamlessly so you always know exactly where they’re up to. This document serves as a guide on how to set up the workflows module.
Solution
- In your MANAGE environment, navigate hover over Tasks and click on Workflow Admin to navigate to the next page
General Settings
The first page that appears when opening Workflow Admin is General Settings.
This page is only used for setting how long completed tasks will stay on your flowboards.

Priorities
The Priorities tab is used to label different priority levels for each flowboard.
There are 5 configurable priority levels, and the mail/text options can be activated to contact staff when tickets are added to flowboards they are responsible for.

Groups
The Groups tab is used to create Groups of people that are responsible for flowboards. As some members of staff will not need access to some flowboards, this is used to approve individual staff to use each flowboard.
Clicking the Add, Edit or Pencil icons allows you to change the Group Name and Group Description. There is also a search function on the top right of the table, which appears across most pages under Manage Workflow.
The search function filters out any information that matches what is typed inside the box, removing anything not relevant.

Roles
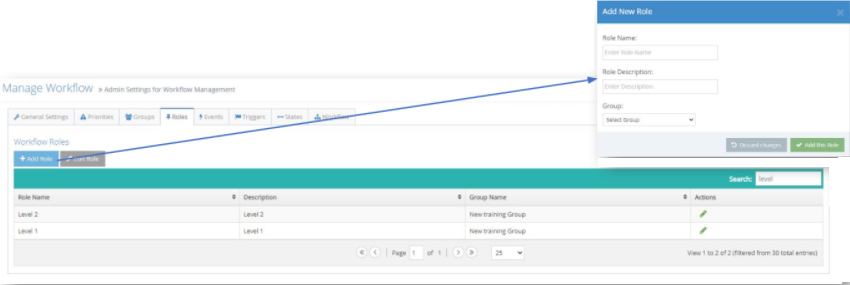
The Roles tab is used to create user roles within Groups. Once a Group has been created, you can then create a Role and assign it to a group, and will then be able to assign users to each role, allowing users to have relevant access rights to flowboards.
For instance, it might be that in a group assigned to a flowboard, some roles can progress a ticket, but only one should be able to complete it. Adding a role opens a new box where you can set a r\ole Name, Description, and assign the role to a Group.
Events
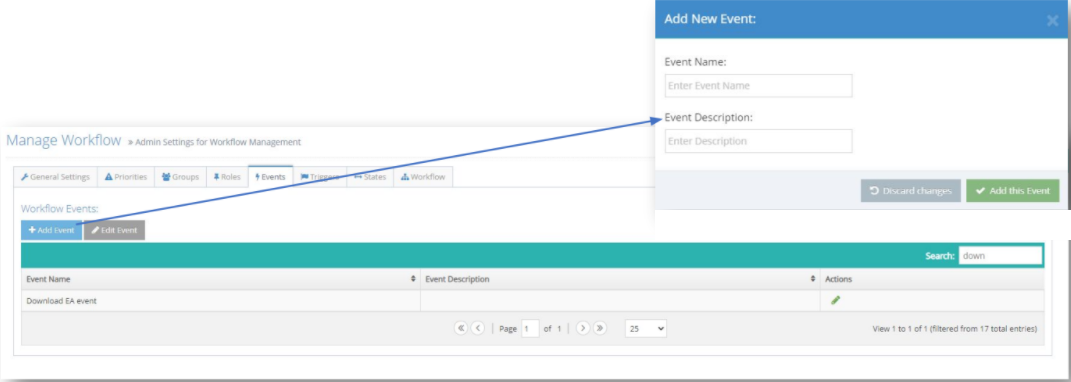
Events are used to describe situations than can trigger a ticket on a flowboard. Creating an event on this page is used to add a description to a trigger, as created on the next page.

Triggers
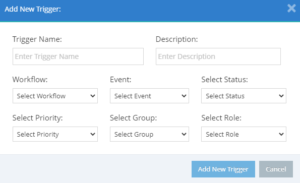
Triggers are added to activity outcomes to create tickets in flowboards, which will be covered later in this document. Adding or Editing a Workflow Trigger opens a new box, which will be covered in detail on the next page.

When creating a Workflow Trigger, there are several parts to set up:
- Trigger Name – The name that will appear when assigning to an Activity outcome
- Description – A description that appears on the Workflow Triggers tab
- Workflow – Which workflow the trigger will raise a ticket in when triggered
- Event – Used to link the trigger with an event
- Priority – Sets the priority level of the ticket raised by this trigger
- Group – Assigns the ticket to a group
- Role – Assigns the ticket to a role within a group
